Two Notes Le Bass Preamp Pedal
You might also want to connect with us on Facebook, YouTube, Instagram, or by email.
Out of stock
THE LE PREAMP
Two notes is first and foremost a team of music lovers who are all great admirers of musicians. Two Notes are highly qualified engineers, technicians, and musicians, whose purpose is to facilitate the life of guitar and bass players without infringing on their playing habits. Our mission consists of providing them with studio-grade products that are specifically designed for the guitar and bass.
From the moment we launched the Torpedo C.A.B., we believed it was possible to build a high-quality pedalboard to entirely replace a conventional tube amplifier system: the complete floor rig. Even with an almost limitless choice of available guitar effects, we always felt that finding a very good preamplifier in a pedal format was challenging. This is why Two notes are proud to premiere its tube preamplifier, Le Bass.
The selection of a preamplifier is the core of your overall tone and thus requires the greatest attention. When building a complete floor rig, only the very best will make the cut. The Two notes preamplifiers are a True High Voltage Design running internally at 200 volts to preserve the interaction between you and your guitar while working perfectly with your other effect pedals. Each of the four different versions deliver the unique tube warmth, dynamics, and the musical compression from the amps we know and love, now in a more convenient pedal package. And, of course, you can use them as an elaborate tube overdrive, in front of your favourite amplifier!
2.3 Two channels plus Fusion mode
The A and B channels are totally independent, each with their own voicing and eq section: Bass and Treble on A, Bass, Mid with Mid Sweep and Treble for B. On Channel A you will find a lower gain tube stage with a pre-gain EQ using a more vintage design approach, while Channel B offers more gain and a very powerful post-EQ (with mid sweep). The exclusive Fusion modes open new horizons.
In “Hot Fusion”, A and B are cascaded, meaning A can be used as a boost for B with both A and B EQ’s available to shape the result. In “Cold Fusion”, the two channels are in parallel, meaning you can blend the cleaner sound from A and your more distorted sound in B to gain clarity and articulation.
2.4 Switching
Each preamp features 2 channel footswitches, A and B. Simultaneously pressing A and B will activate the Fusion mode. Pressing A, B or A and B will also send a specific Midi Program Change command, that can be used to select a preset on your Midi multi-effects and/or Torpedo C.A.B.
In addition, the preamplifier may respond to a Program Change sent from another Midi device allowing a seamless integration into any pedalboard switching system. Combining several Two notes preamps on your pedalboard makes things really interesting. Connected via Midi, each preamp will listen to the others. They can be configured in Multi-channel mode: pressing A on preamp 1 will bypass preamp 2, like the channels of an amplifier. Alternately, when this mode is off: traditional on/off switching for all preamps, a preamp can be a boost/overdrive for the one that follows.
the ultra clean Channel A is perfect for today’s modern techniques with lightning fast response and a full spectrum of tone. Channel B tips its hat to the foundation of rock bass with solid punch and a sweet break up available when things get down and dirty. Cold Fusion lets you live in the limelight with the best of both worlds while Hot Fusion lets you take center stage with searing bass from a focused distortion to synth-like growls.
| 1 | Channel B footswitch | This footswitch activates the clean Channel B or changes the page/parameter in MIDI programming. If the Channel A is already selected, pressing a second time will put your Le Preamp in bypass mode |
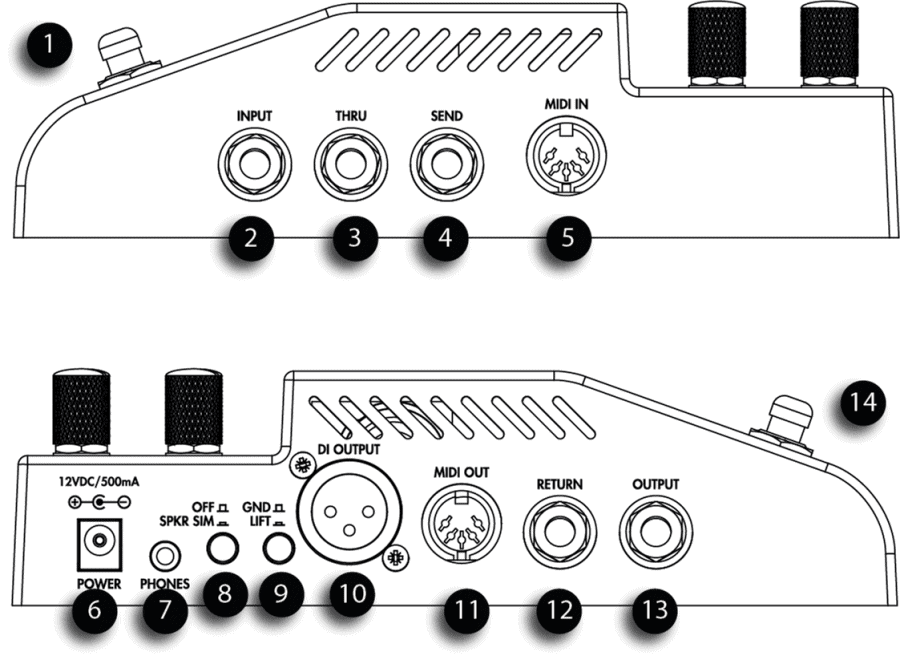
| 2 | Instrument input | Connect a 1/4“ unbalanced shielded cable to your guitar or bass. |
| 3 | Thru output | Connect a 1/4” unbalanced shielded cable to feed an amplifier with your instrument signal. This can be useful on stage of you want to keep an amp as monitor, or to record the dry signal from the guitar in studio. |
| 4 | FX Loop Send output | Plug here a 1/4“ unbalanced shielded cable to send the preamp signal to the pedals you want to put after the preamp stage. The FX Loop is bypassed when the Le Preamp is bypassed. In other words, the effects pedal that you put in this loop won’t be heard when your Le Preamp is bypassed. That is very interesting in case you have several Le Preamp and you wish to assign specific effects to each preamp. |
| 5 | MIDI input | Connect a MIDI controller (to remotely control your Le Preamp) or another Le Preamp to this input. Use only a cable featuring a 5-pin DIN connector with all the pins wired (some cables only have pins 4, 2 and 5 connected). Pin 1 and 3 are used to carry the Multi-channel message. |
| 6 | Power adapter connector | Plug here your power adapter |
| 7 | Headphones output | Plug your headphones and play in the middle of the night without disturbing anybody! With headphones, and in case you don’t have speaker simulator such as a Torpedo C.A.B. in the FX loop, we recommend you activate the analog speaker simulation |
| 8 | Speaker Simulation | This analog speaker simulation is specifically voiced for your Le Preamp Model, and based on our Torpedo simulator. The simulation is based on our classic Brit VintC 4×12 picked up with a Dyn57 for the Le Clean, Le Crunch, Le Lead and on a mix of the vintage Fridge 8×10 and more modern Alu XL 4×10, picked up with a Cnd87 for Le Bass. This speaker simulation affects the DI output and the Headphones output. |
| 9 | Ground Lift | |
| 10 | Balanced DI output | This direct balanced XLR output should be connected to a mixing desk, or a sound card for a recording. With the speaker simulation on that’s all you need to achieve a great sound! |
| 11 | MIDI output | Connect this MIDI output to a MIDI device or another Le Preamp you wish to control with your preamplifier. |
| 12 | FX Loop Return Input | Plug here an unbalanced 1/4” cable connected to the last pedal you put in the loop. The FX Loop is bypassed when the Le Preamp is bypassed. |
| 13 | Instrument output | Connect this output with a 1/4“ unbalanced shielded cable either to a power amplifier or a speaker simulator such as the Torpedo C.A.B., or directly into your digital audio interface for a recording. |
| 14 | Channel A footswitch | This footswitch activates the A “dirty” channel or enter a page in MIDI programming. If the channel B is already selected, pressing a second time will put your Le Preamp in bypass mode. |
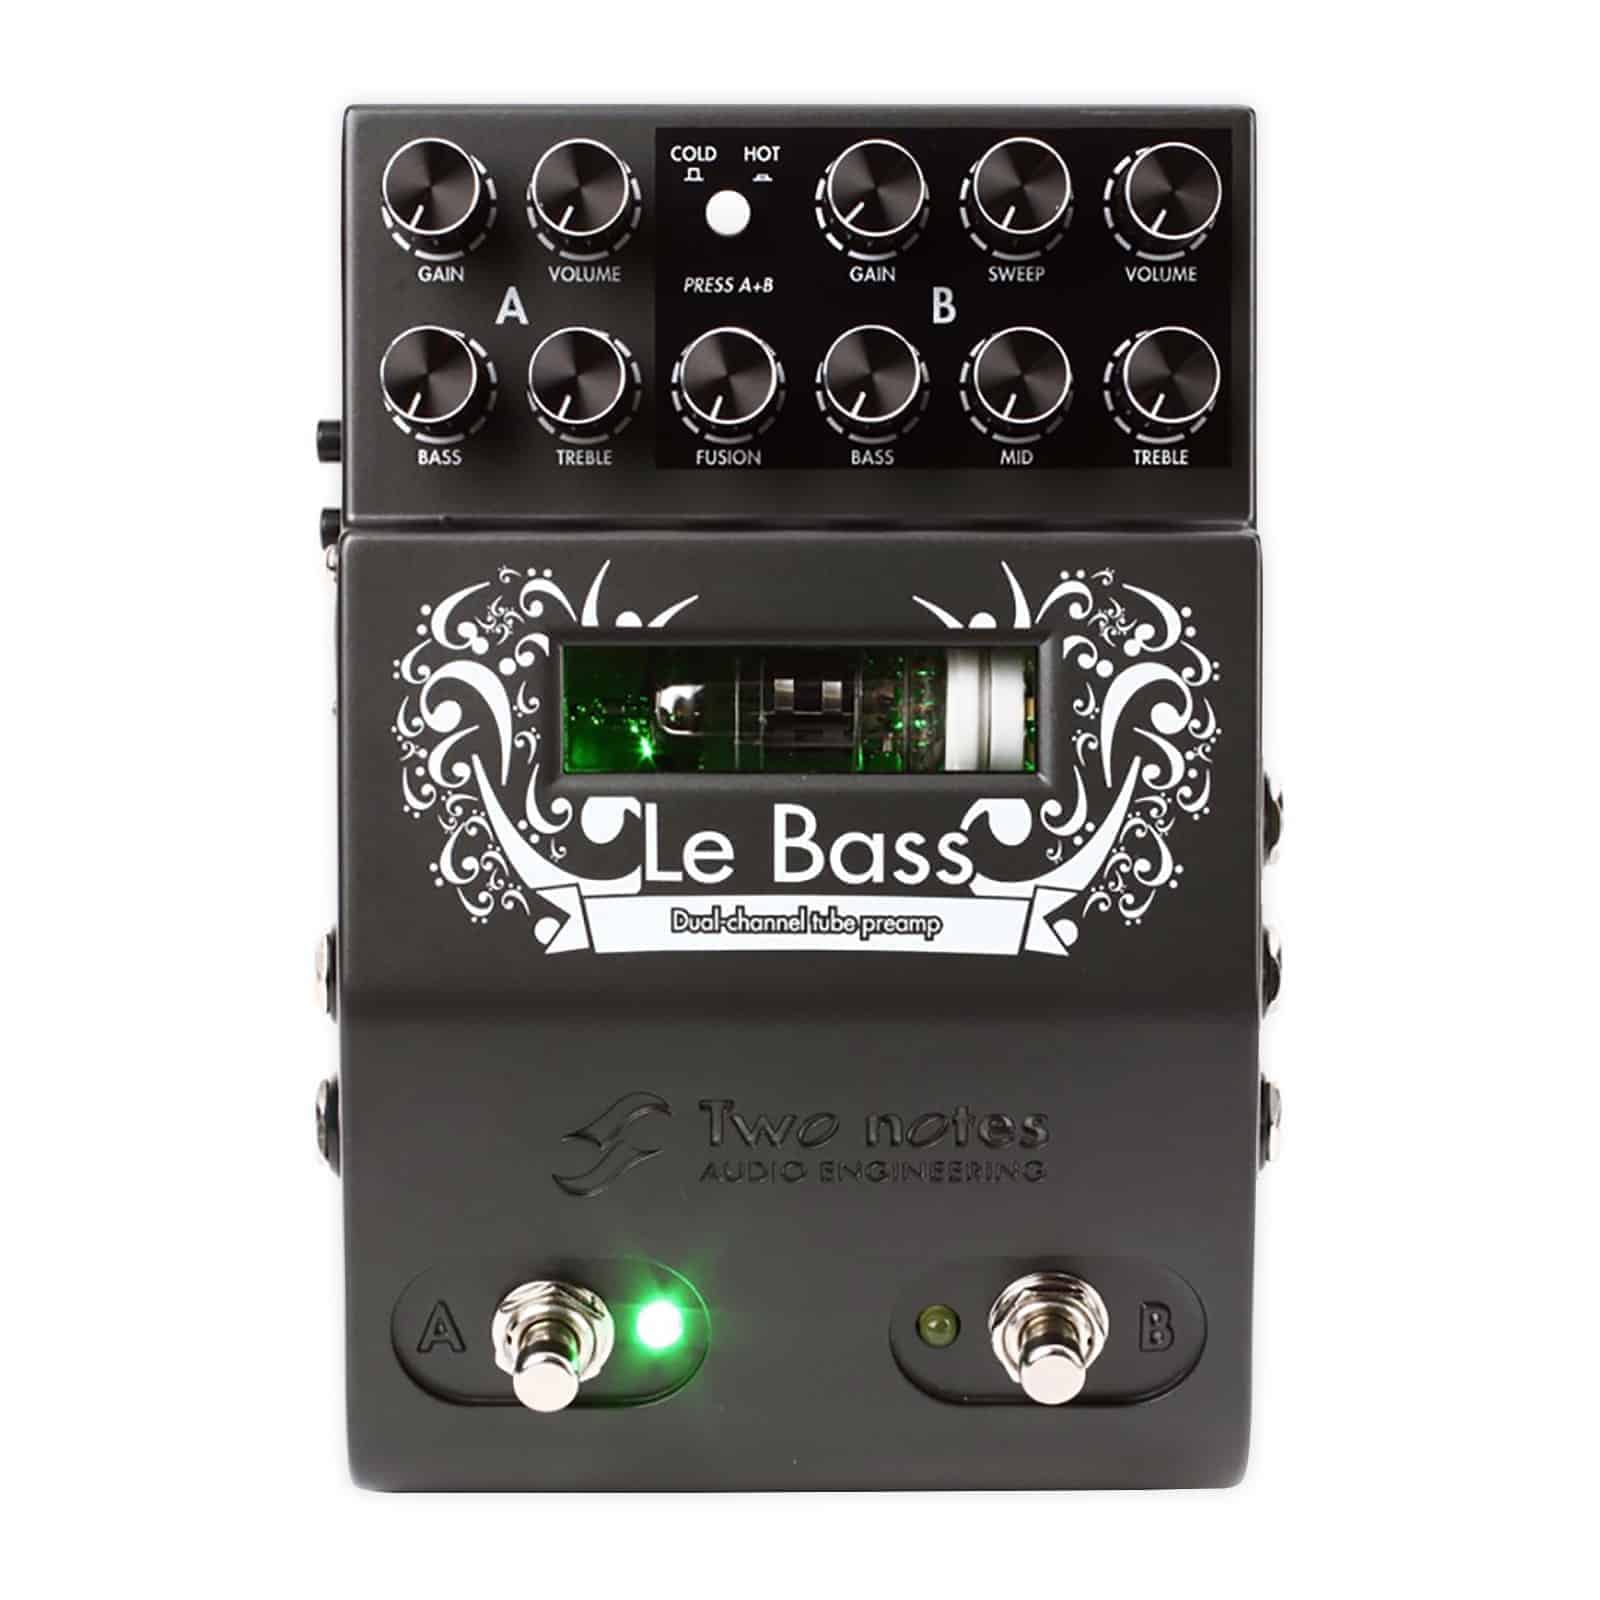
3.2 Front view

You will find in this table a description of the volume, tone and channel selection options.
| 1 | Channel A footswitch | This footswitch activates the clean Channel A or changes the page/parameter in MIDI programming. If the Channel A is already selected, pressing a second time will put your Le Preamp in bypass mode |
| 2 | Channel A Input Gain | Determines the amount of gain for your clean tone. Increasing the gain can lead to more signal distortion, and even unwanted clipping. Adjust that parameter to your taste, the gain level you will be getting depends on Le Preamp, but also on your guitar/bass pickups level and the level of other products such as pedals you may have inserted between your guitar and Le Preamp. |
| 3 | Channel A EQ settings | The Channel A features a passive Bass (low frequency) and Treble (high frequency) voicing section. |
| 4 | Channel A volume | Determines the output volume of the channel A, the volume is located pre-FX Loop. This knob is inactive in Fusion mode. In case you hear unwanted clipping, try lowering the volume too and make sure the following device in your signal path is not overdriven. |
| 5 | Fusion mode selector | Pressing the A and B footswitches at the same time will activate the Fusion mode. The Fusion switch determines if either the Hot Fusion or the Cold Fusion modes will be activated. Read more about the Fusion modes in the following pages. |
| 6 | Fusion Level | In Hot Fusion, this knob determines the level of Channel A that will boost the Channel B. In Cold Fusion, this knob determines the volume of Channel A that will be added in parallel to the channel B. |
| 7 | Channel B Input Gain | Select the amount of gain for your dirty tone. Increasing the gain will lead to more distortion of the signal, and even unwanted clipping. Adjust that parameter to your taste, the gain level you will be getting depends on Le Preamp, but also on your guitar/bass pickups level and the level of other products such as pedals you may have inserted between your guitar and Le Preamp. Always keep in mind that even if we put all our attention on keeping the noise level as low as possible, increasing the gain can lead to unwanted noises and undesirable feedback. |
| 8 | Channel B EQ settings | The channel B features a passive Bass (low frequency) and Treble (high frequency) voicing section, plus an active Mid (medium frequency) setting with Sweep. Thanks to the Sweep parameter you will be able to choose the center frequency of your medium range voicing |
| 9 | Channel B volume | Determines the output volume of the channel B. The volume is located pre-FX Loop. In case you hear unwanted clipping, try lowering the volume too and make sure the following device in your signal path is not overdriven. |
| 10 | Tube window | With Le Preamp, you can see the finely selected tube working! Plus, depending on the channel, that area will display different colors: Green for Channel A, Yellow for Channel B, Blue for Cold Fusion mode and Red for Hot Fusion mode. The MIDI programming features different colors, read more about this in the MIDI section of this manual |
| 11 | Channel B footswitch | Connect this MIDI output to a MIDI device or another Le Preamp you wish to control with your preamplifier. |
3.3 More on the Fusion modes
By pressing simultaneously the A and B switches, you will enter the Fusion mode. When the Fusion mode is activated, pressing A and B again will defeat your Le Preamp.
3.3.1 Cold Fusion

The Cold Fusion puts the Channels A and B in parallel. In other words, you will be able to adjust the level of Channel A that will be added to the output of Channel B. This technique consisting in adding a clean signal to a more distorted one is widely used in the studio to regain dynamics and articulation when the dirty sounds can be too compressed for example. The Fusion knob must be carefully adjusted and we recommend starting very low on this value and increasing gradually.
3.3.2 Hot Fusion
The Hot Fusion puts the Channels A and B in cascade. In this configuration, the Channel A can be considered a boost for the channel B, and the Fusion knob determines the amount of boost signal you send into B.

The gain on the channel A will be very important and it is the addition of this gain and the Fusion amount that will determine the overall distortion you will get. The channel A features an EQ, and changing the EQ will play a huge role in the overall tone. If you push the bass your sound will get more fuzzy, and if you push the treble you will have a more glassy distortion. With these very simple settings you will discover many tonal options! Always keep in mind that the sweet spot is rarely on the maximum values, take the time to increase each parameter gradually. Sometimes it’s better to have the Fusion knob at a lower value and increase the gain on channel A, remember these settings are very sensitive.
3.4 More on the Mid Sweep
The Mid Sweep is a very powerful tonal option. It can be used either to boost or to attenuate a medium frequency range. A good way to start with that function is, first, to set your Mid level to the max, then search for the frequency you want either boost or attenuate by adjusting the SWEEP level. When you hear that frequency, you can either lower a little the mid level or keep it that way for a medium boost, or strongly attenuate the frequency by decreasing the Mid level.
4. Connecting the Le Preamp
The Le Preamp can be used in various configurations: as a boost or distortion pedal for your amplifier, as a preamplifier connected to a power amplifier and cabinets, or in a direct setup for recording, playing on stage or simply at home with your headphones. The following diagram presents the various possible connections of the Le Preamp. Please note that this diagram doesn’t show all the wiring possibilities of the product, just the most common ones.

4.1 What if I want to use several Le Preamp?
You can, in fact, they were specifically designed to work together! Please refer to the following figure. On this figure you will find, in green, the MIDI connections, and in blue the audio connections. When connecting several Le Preamp with MIDI for the first time, switching on a preamp channel will defeat the other preamps. We call it the Multi-channel mode: having more Le Preamp is like adding channels on an amplifier, and it’s as simple as using a channel footswitch on a traditional multichannel amplifier. When connecting several Le Preamp with a MIDI cable, make sure you use a 5-pin DIN cable with all the pins wired. Some cables only have pins 4, 2 and 5 connected. Pin 1 and 3 are used to carry the Multi-channel message.

Regarding the effects position:
-
Before the first preamp, we put all the effects we may want to apply to any Le Preamp in the chain. It could be a distortion pedal, a compressor, a volume pedal, anything you can put in front of an amplifier.
-
In the FX loop of each preamp, we put the effects we want to apply only to one of the preamps. For example, a specific delay we want only on Le Preamp 2.
-
Finally, after the last preamplifier, we put all the global effects that are usually better sounding after the preamp stage: modulation or reverb effects, a speaker simulator such as the Torpedo C.A.B., and stereo effects. By placing the stereo effects at the end of the chain, the next device (mixer, stereo power amp, recorder etc…) can be fed by a stereo signal.